

Key points for softening water equipment installation
Category:
Time of issue:2022-01-12
Water Softener Installation Requirements
1. The foundation must be level, and a floor drain or drainage ditch should be installed nearby to drain the regenerated wastewater. A separate power outlet should be provided near the equipment.
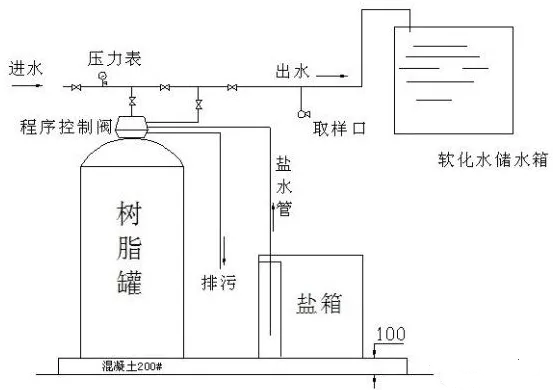
2. The salt tank should be close to the exchange tank, and the salt suction pipe should be as short as possible.
3. A Y-type filter and water meter should be installed on the inlet pipe, and a sampling port should be provided at the outlet.
4. Manual valves should be installed on the inlet and outlet pipes, and a bypass valve should be installed between the inlet and outlet to allow continued water supply during regeneration or maintenance.
5. If the inlet water pressure is lower than 0.2 MPa, an automatic booster pump should be added.
6. The salt in the salt tank must be industrial salt; iodized salt or calcium salt cannot be added. To ensure that the salt solution concentration in the salt tank reaches saturation, the dissolution time must be no less than 6 hours. A forced regeneration should be performed before the first use.
7. If the raw water hardness is >6 mmol/L, the selection should be increased by 1-2 levels.
8. The pipeline must be flushed before use to prevent impurities from clogging the valve body and contaminating the resin.
9. Antifreeze measures should be added to the water softener equipment in northern winters.
Details of Water Softener Installation
First, select the installation location for the water softener equipment.
1. The system should be as close to the drainage point as possible.
2. If other water treatment facilities are needed, consider reserving installation locations.
3. Because salt needs to be added to the salt tank regularly, consider the location for placing the salt.
4. Do not install the water softener equipment within 3 meters of the boiler (the outlet of the softened water and the inlet of the boiler), otherwise, hot water will flow back into the water softener equipment and damage the equipment.
The equipment should be placed in an environment with a temperature below 1°C and above 49°C. Keep away from acidic substances and acidic environments.
Second: Connection of Water Softener Pipes
1. The connection of the pipeline system should comply with the "Water Supply and Drainage Pipeline Construction Standard".
2. Connect the inlet and outlet pipes according to the control diameter.
3. Manual valves should be installed on the inlet and outlet pipes, and a bypass valve should be installed between the outlet pipes. This is to facilitate the discharge of residual materials during the installation and welding process to prevent resin contamination; it also facilitates maintenance.
4. A sampling valve should be installed at the outlet, and a Y-type filter is recommended for the inlet pipe.
5. Minimize the length of the drain pipe (<6 meters) and do not install any valves. Only polytetrafluoroethylene tape can be used for sealing during installation.
6. There must be space between the drain pipe and the water surface of the drain to avoid siphonage.
7. Each pipe must have an independent bracket; the weight and stress of the pipe should not be transferred to the control valve.
Third: Electrical Connection of Water Softener Equipment
1. All electrical connections must comply with electrical construction standards.
2. Confirm that the electrical parameters of the controller are consistent with the power supply.
3. There is a separate power outlet.
Fourth: Installation of Water Distributor and Central Pipe of Water Softener Equipment
1. Use PVC glue to bond the central pipe and the water distributor seat together.
2. Insert the bonded central pipe into the resin tank.
3. Tighten the branch pipes of the water distributor onto the water distributor seat.
4. After the water distributor is installed, the central pipe should be vertically positioned in the center of the exchange tank, and then the PVC pipe above the tank opening should be cut off.
5. Place the resin tank in the selected location. Securely bond the central pipe and the lower water distributor with glue. With the lower water distributor facing down, insert the central pipe into the resin tank. The height of the central pipe plus the height of the lower water distributor should be flush with the tank opening. Cut off the excess central pipe. Note that the upper opening of the central pipe should be smooth and free of burrs. Remove the central pipe.
6. Add resin to the resin tank, but do not fill it completely. Leave space for backwashing the resin, with a height of about 40%-60% of the resin layer height.
7. Place the upper water distributor on the central pipe, or first fix the upper water distributor to the bottom of the control valve. Note that regardless of where the upper water distributor is placed, it should be ensured that it will not fall off and cause the resin to escape.
8. Insert the central pipe into the bottom of the control valve. Note: The central pipe must pass through the O-ring inside and be lubricated with a water-insoluble lubricant before being screwed into the valve to avoid damaging the sealing ring. Secure the upper water distributor to the multi-port valve.
Tags:
-- Recommended --


Shijiazhuang Tianwang Environmental Protection Technology Co., Ltd.
Shijiazhuang Tianwang Environmental Protection Technology Co., Ltd. is a high-tech enterprise specializing in the research and development, manufacturing and sales of water treatment equipment.
Contact Information
Production address: No. 9, Fengchan Road, Economic and Technological Development Zone, Shijiazhuang City
Office Address: 25th Floor, Block C, No. 310 Changjiang Avenue, Shijiazhuang High-tech Development Zone
Contact Number:
0311-89272359 0311-68039237
Enterprise Email:
twhbkj@163.com
Website: en.sjztwhb.com